> ## Documentation Index
> Fetch the complete documentation index at: https://docs.embeddables.com/llms.txt
> Use this file to discover all available pages before exploring further.
# Accepting Stripe Payments in Embeddables
> How to accept payments with our deep Stripe integration
Payments in Embeddables are handled via [Stripe](https://stripe.com), with a dedicated Stripe component that is integrated deeply into our platform.
 ## Checkout types
The Stripe Checkout component supports two checkout types:
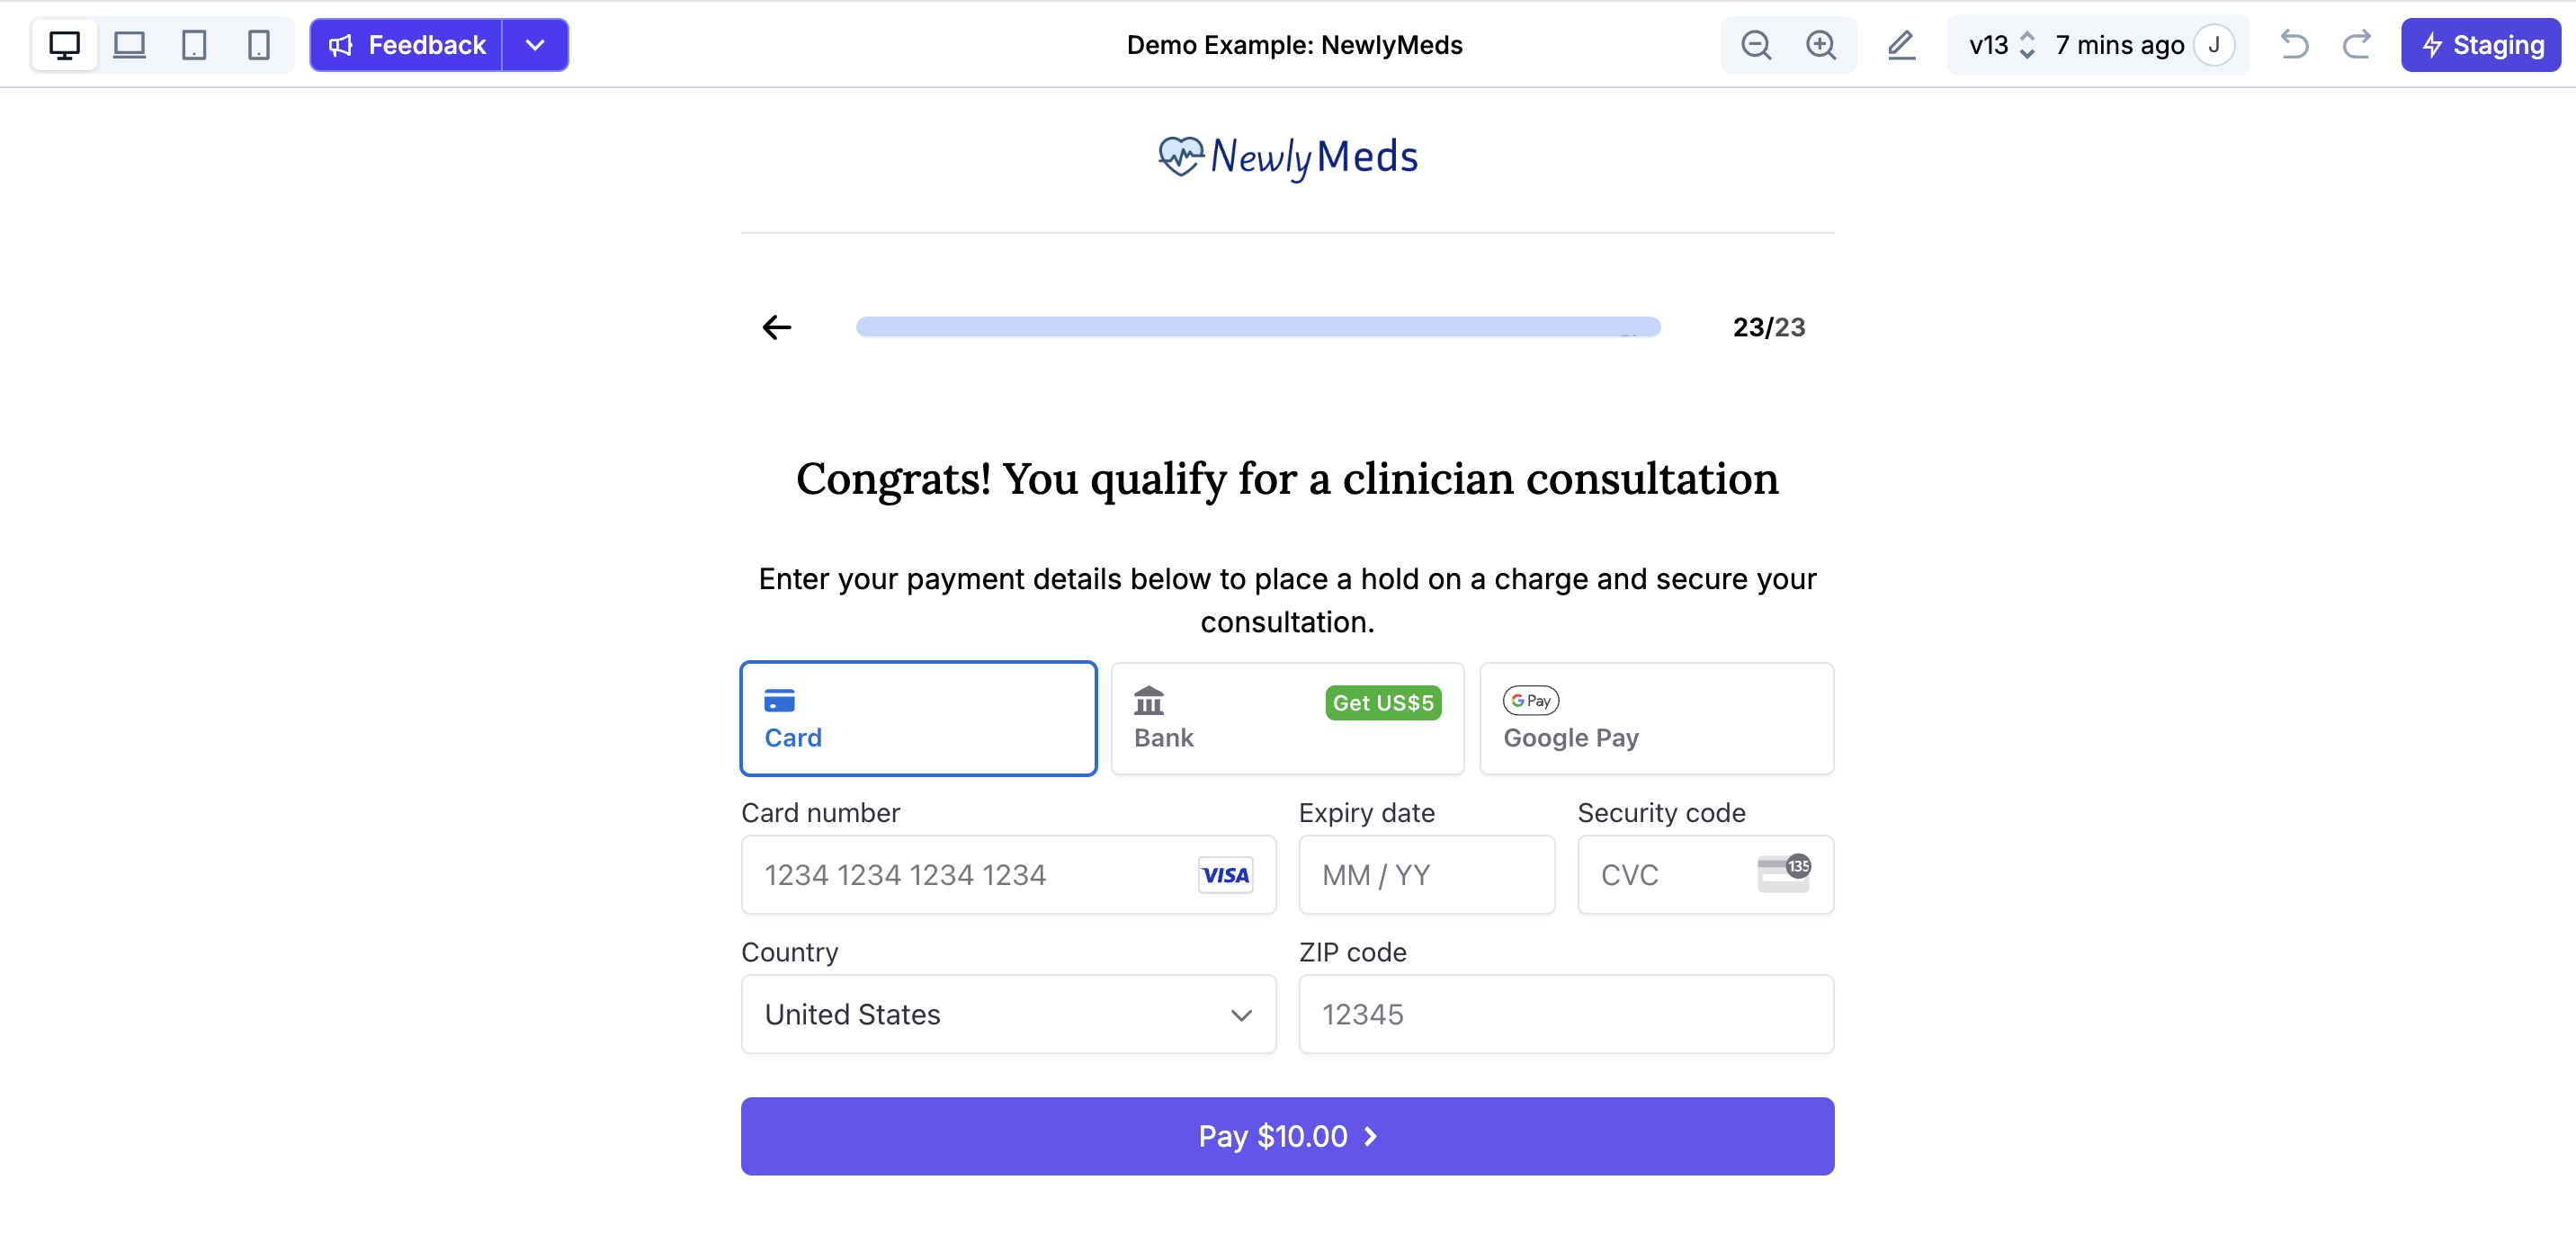
The standard checkout experience where customers enter their payment details (credit card, bank account, etc.) directly in the embedded form. This is the default and most common type.
## Checkout types
The Stripe Checkout component supports two checkout types:
The standard checkout experience where customers enter their payment details (credit card, bank account, etc.) directly in the embedded form. This is the default and most common type.
 A streamlined checkout experience that displays quick-pay buttons such as Apple Pay, Google Pay, and Link. Express Checkout lets returning customers complete purchases faster using saved payment methods in their wallets.
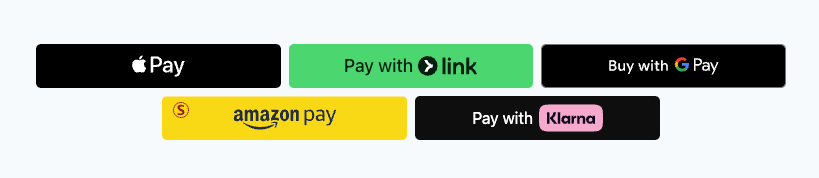 You select the checkout type when configuring the Stripe component in the Builder. You can enable both types at the same time — for example, offering Express Checkout buttons alongside the standard payment form. The checkout type(s) you choose determine which configuration options and triggers are available.
Some configuration fields and triggers only apply to Express Checkout. These are clearly marked throughout this documentation.
## Keys and IDs that you'll need
1. Your Stripe **Publishable Key** - grab this from the [API Keys](https://dashboard.stripe.com/apikeys) section of your Stripe Dashboard.
2. A **Restricted Key** generated in Stripe (also from the [API Keys](https://dashboard.stripe.com/apikeys) page in Stripe), with the following scopes/permissions:
Restricted Key - required scopes:
* `Customers`: `Write`
* `Payment Intents`: `Write`
* `Setup Intents`: `Write`
* `Checkout Session`: `Write`
* `Credit notes`: `Read`
* `Subscriptions`: `Write`
3. Any **Price IDs** for specific products you want to offer - grab these from the [Products](https://dashboard.stripe.com/products) page in Stripe.
## Setting up Stripe
The following are the minimum steps required to add a Stripe component to your Embeddable:
* Go to **Settings** → **Credentials & Endpoints** in your Embeddables dashboard.
* In the **Stripe Credentials** section, click **+ New Stripe Credential**.
* Choose the **Key Type** (Publishable Key or Restricted Key).
* Select the Live **Environment**.
* Add a **Label** to help identify the credential (e.g., "Stripe Live Publishable Key").
* Enter your **Value** (the actual Stripe key). (See above for details on the keys to grab/generate).
* Click **Create** to save the credential.
You can also add credentials for the `Test` environment if you want to - if so, these will be used when in test mode instead of the default Embeddables-provided test keys.
* In the Builder, switch to the checkout page that should contain the Stripe component.
* Select a Container to insert the Stripe component into, or a copmonent that it should be added next to.
* Open the `+` left-hand sidebar, and select `Stripe` from the list of components.
* Under Checkout mode, select one of the following options:
* **Payment**: If you're accepting only one-time payments, or want to place a hold on a user's card.
* **Setup**: For setting up a user's payment method to take payments in the future.
* **Subscription**: If your line items will include at least one recurring payment.
Please note that Stripe only supports placing a hold on one-time payments, not recurring payments.
* Under Payment methods, select the payment methods you want to accept, from the following options:
* **Credit card**
* **Link** (Stripe's own quick purchase login system)
* **US Bank Account**
* **Buy now, pay later services**: Afterpay/Clearpay, Klarna, Affirm
You need to have the relevant payment methods enabled in your Stripe account in order for them to appear for users.
* There are two different types of line item that you can add:
1. **Price ID**: This corresponds to a product and price that you've already created in Stripe.
Make sure to grab the **Price ID** from Stripe, rather than the Product ID.
* Go to the [Product Catalog](https://dashboard.stripe.com/products) section of your Stripe Dashboard.
* Select the product you want to use.
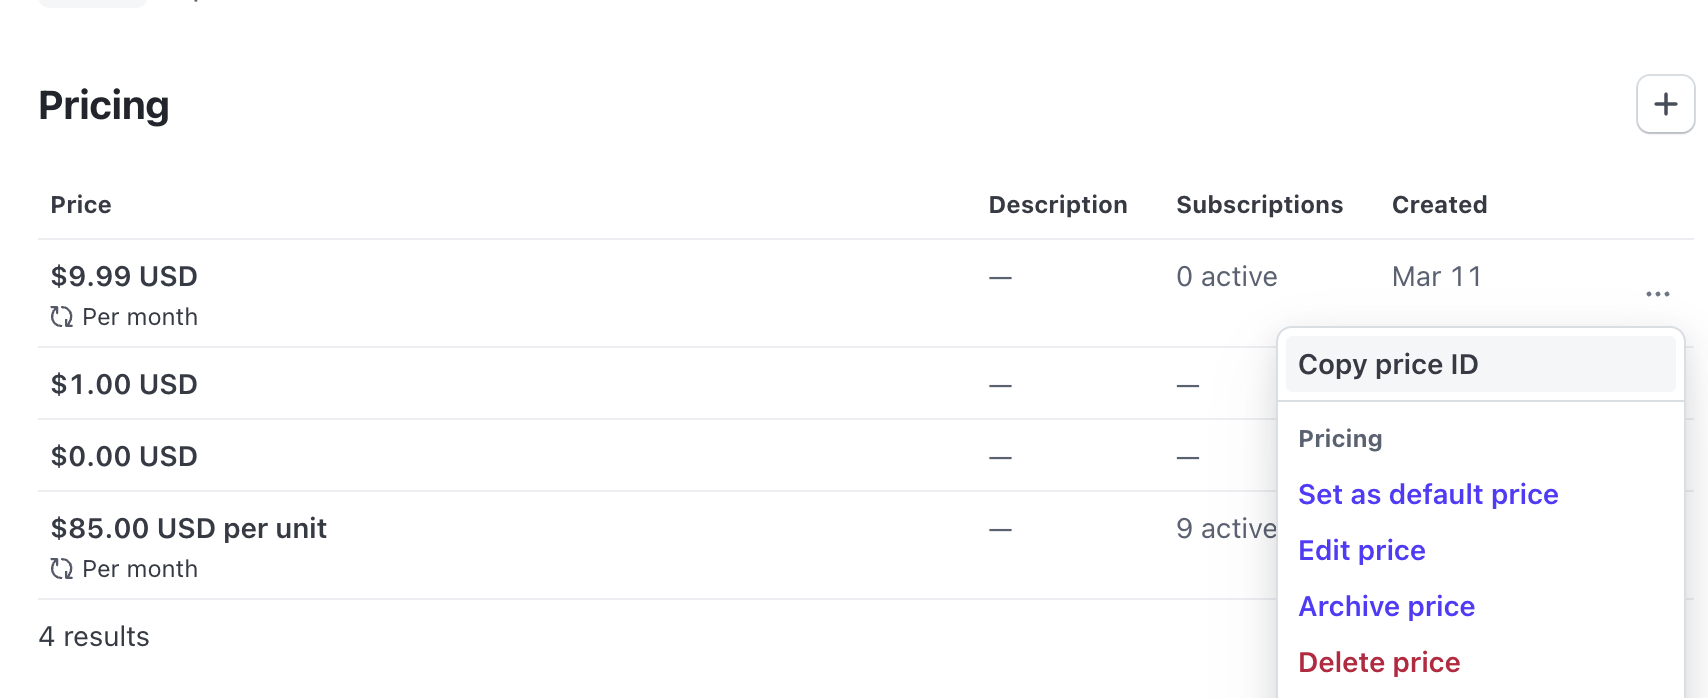
* Click on the more options (three dots) icon button in the Price that you want to use.
* Select `Copy price ID`.
You select the checkout type when configuring the Stripe component in the Builder. You can enable both types at the same time — for example, offering Express Checkout buttons alongside the standard payment form. The checkout type(s) you choose determine which configuration options and triggers are available.
Some configuration fields and triggers only apply to Express Checkout. These are clearly marked throughout this documentation.
## Keys and IDs that you'll need
1. Your Stripe **Publishable Key** - grab this from the [API Keys](https://dashboard.stripe.com/apikeys) section of your Stripe Dashboard.
2. A **Restricted Key** generated in Stripe (also from the [API Keys](https://dashboard.stripe.com/apikeys) page in Stripe), with the following scopes/permissions:
Restricted Key - required scopes:
* `Customers`: `Write`
* `Payment Intents`: `Write`
* `Setup Intents`: `Write`
* `Checkout Session`: `Write`
* `Credit notes`: `Read`
* `Subscriptions`: `Write`
3. Any **Price IDs** for specific products you want to offer - grab these from the [Products](https://dashboard.stripe.com/products) page in Stripe.
## Setting up Stripe
The following are the minimum steps required to add a Stripe component to your Embeddable:
* Go to **Settings** → **Credentials & Endpoints** in your Embeddables dashboard.
* In the **Stripe Credentials** section, click **+ New Stripe Credential**.
* Choose the **Key Type** (Publishable Key or Restricted Key).
* Select the Live **Environment**.
* Add a **Label** to help identify the credential (e.g., "Stripe Live Publishable Key").
* Enter your **Value** (the actual Stripe key). (See above for details on the keys to grab/generate).
* Click **Create** to save the credential.
You can also add credentials for the `Test` environment if you want to - if so, these will be used when in test mode instead of the default Embeddables-provided test keys.
* In the Builder, switch to the checkout page that should contain the Stripe component.
* Select a Container to insert the Stripe component into, or a copmonent that it should be added next to.
* Open the `+` left-hand sidebar, and select `Stripe` from the list of components.
* Under Checkout mode, select one of the following options:
* **Payment**: If you're accepting only one-time payments, or want to place a hold on a user's card.
* **Setup**: For setting up a user's payment method to take payments in the future.
* **Subscription**: If your line items will include at least one recurring payment.
Please note that Stripe only supports placing a hold on one-time payments, not recurring payments.
* Under Payment methods, select the payment methods you want to accept, from the following options:
* **Credit card**
* **Link** (Stripe's own quick purchase login system)
* **US Bank Account**
* **Buy now, pay later services**: Afterpay/Clearpay, Klarna, Affirm
You need to have the relevant payment methods enabled in your Stripe account in order for them to appear for users.
* There are two different types of line item that you can add:
1. **Price ID**: This corresponds to a product and price that you've already created in Stripe.
Make sure to grab the **Price ID** from Stripe, rather than the Product ID.
* Go to the [Product Catalog](https://dashboard.stripe.com/products) section of your Stripe Dashboard.
* Select the product you want to use.
* Click on the more options (three dots) icon button in the Price that you want to use.
* Select `Copy price ID`.
 2. **Custom line item**: This lets you manually enter an amount, currency and name for the line item in Embeddables.
* Both types of line item require you to enter a quantity.
If you need your line items to be dynamic (i.e. change based on the user's answers, like what plan they select), see the [Add dynamic line items](#add-dynamic-line-items) section below.
* To insert the user's given email address into the Stripe checkout, add the key name of the component you use to collect the user's email, using **Templating** (e.g. `{{email}}`).
* You can optionally collect a user's phone number, using the same method.
By default, Stripe's credit card fields will also include Country and Zipcode / Postal Code fields.
These are all Stripe needs for a customer billing address, so you don't need to provide any billing address fields.
* Most brands want to [make sure a Customer is created in Stripe](#make-sure-a-customer-is-created-in-stripe) for new purchases, and [automatically set default payment methods in Stripe](#automatically-set-default-payment-methods-in-stripe) for those customers.
* It's worth deciding on [which payment method tabs](#control-which-payment-method-tabs-are-shown) you want to show to customers, including setting up [Apple Pay and Google Pay](#set-up-apple-pay-and-google-pay) if desired, and deciding whether to enable [Stripe Link](#set-up-stripe-link).
* You may want to [collect shipping information](#collect-shipping-information) if you're sending a physical product (billing information is usually collected automatically by Stripe using the zipcode/postal code field).
* See below for a full list of optional settings you might want to configure.
## Optional: Additional Stripe configurations
These features are not required in order to successfully accept payments, but they can be useful in different scenarios.
To collect shipping information from the user, you need to make sure you have the relevant input components in your Embeddable:
* Address Line 1
* Address Line 2
* City
* State
* Zipcode / Postal Code
* Country
Then, enter the keys of these components in the Shipping Address fields in the Stripe component using Templating, e.g. `{{address_line_1}}`.
Shipping information is optional, depending on whether you're sending the customer a physical product.
Billing information is required, but only country and postal code. This is handled automatically by the Stripe component, as described above, so you don't need to add your own billing address fields.
Sometimes you need your line items to be dynamic - i.e. change based on the user's answers, such as the plan that they select.
To do this:
1. Use a [Computed Field](/features/computed-fields)\` to generate the JSON for the line items.
2. Refernce the key of that Computed Field in the Line Items section of the Stripe component.
In order for the Stripe component to still work when the Embeddable is in test mode, you need to ensure that the Computed Field handles test mode correctly by returning a test price\_id.
**Example Computed Field code:**
```javascript theme={null}
// @TODO: Delete one of these based on whether you're charging a recurring or one-time payment
const TEST_PRICE_ID = 'price_1JMwNRIQ3JVMlttKsvCn3lK3' // This is a recurring Embeddables-provided test price ID
const TEST_PRICE_ID = 'price_1KGqjRIQ3JVMlttKzJ059opF' // This is a one-time Embeddables-provided test price ID
// @TODO: Replace these constants
const PRICE_ID_PLAN_1 = 'price_aaaaaaaaaaaaaaaaaaaaaaaa'
const PRICE_ID_PLAN_2 = 'price_bbbbbbbbbbbbbbbbbbbbbbbb'
// All Computed Fields must contain a function called result()
function result(userData) {
// Determine whether we're in test mode
const url = new URL(window.location)
const isTestMode = url.searchParams.get('savvy_test') === 'true'
|| (!url.searchParams.get('savvy_test') && url.searchParams.get('savvy_env'))
|| (!url.searchParams.get('savvy_test') && url.host.endsWith('embeddables.com'))
const testPriceId = TEST_PRICE_ID
// Determine which price_id the user has selected
const selectedPriceId = userData.selected_plan === 'advanced' ? PRICE_ID_PLAN_2 : PRICE_ID_PLAN_1
// If we're in test mode, use the test price_id, otherwise use the selected product's price_id
const priceId = isTestMode ? testPriceId : selectedPriceId
// Return the line items
return [
{
price: priceId,
quantity: 1,
},
];
}
```
You can set pretty much any value in the Stripe component based on dynamic data, such as the user's answers to a question (e.g. their email address), or a value that's computed from an answer (e.g. the post-purchase success message).
For values that come directly from user answers (like email, phone number, or shipping address):
1. Add an input component (like Email Input, Phone Input, etc.) to your Embeddable where you want to collect the user's information.
2. In the Stripe component settings, locate the field you want to set dynamically.
3. Use templating syntax to reference the input component's key, e.g. `{{email}}` or `{{phone}}`.
This works for any field in the Stripe component that accepts templating, including:
* Customer email
* Customer phone
* Shipping address fields
* Pay button text
* Success message
For values that need to be calculated or transformed (like a dynamic success message):
Create a [Computed Field](/features/computed-fields) that will generate the value you want.
In the Computed Field, write code that returns the final value. For example:
```javascript theme={null}
function result(userData) {
const name = userData.first_name || 'there';
return `Thanks ${name}! Your payment has been processed successfully.`;
}
```
In the Stripe component settings, use templating to reference the Computed Field's key, e.g. `{{success_message}}`.
You can mix and match both approaches - some fields might use simple templating while others use computed fields, depending on your needs.
If you handle multiple Stripe products or prices in your Embeddable, we recommend adding them to a table in the [Embeddables CMS](/features/cms), and pulling those records into your Embeddable to use in your Stripe component.
See the [Control Stripe Prices from the Embeddables CMS](/how-to/control-stripe-prices-from-cms) guide for more information.
You can offer discounts to your customers using Stripe's coupon and promo code system. This lets you create both customer-facing promo codes (like "BLACKFRIDAY50") and automatic discounts.
See the [Use Stripe Coupons and Promo Codes](/how-to/use-stripe-coupons-and-promo-codes) guide for more information.
If you have more than one Stripe Checkout component on the same page (for example, a Payment element and an Express Checkout element side-by-side), you can make them share a single underlying Stripe Checkout session by setting `use_shared_stripe_session: true` on each component.
**Why use this?**
* Ensures coupons and promo codes applied to the session are immediately reflected on every component's "Pay" button.
* Avoids creating multiple independent checkout sessions for the same purchase, which could lead to duplicate charges.
**How to enable it:**
1. In the Builder, select each Stripe Checkout component that should share the session.
2. Open the component's JSON editor and add `"use_shared_stripe_session": true` to the component's options.
3. Repeat for every Stripe Checkout component on that page that should participate.
All components in the shared session must use the same **Checkout mode** (e.g. all Payment, or all Subscription) and the same **currency**. Mismatched values will produce an error.
Shared sessions are scoped to a single page. Components on different pages each create their own independent session.
When `disable_button_until_page_valid` is set to `true` on a Stripe Checkout 2 component, the Pay button is disabled reactively whenever any required field on the current page is incomplete or invalid. The button re-enables as soon as all required fields are satisfied.
This is different from `enforce_validation`, which only blocks the payment attempt at the moment the user clicks Pay. With `disable_button_until_page_valid` the button itself is visually disabled throughout, giving users an immediate cue that they still need to fill something in.
**How to enable it:**
1. In the Builder, select the Stripe Checkout 2 component.
2. Open the component's JSON editor and add `"disable_button_until_page_valid": true`.
You can style the disabled state however you like using CSS targeting `[disabled]` on the Pay button element. No default disabled style is applied — full control is yours.
This setting works in conjunction with the existing `enforce_validation` option. If you only want to block the payment attempt (without visually disabling the button beforehand), use `enforce_validation: true` without setting `disable_button_until_page_valid`.
See the [Place a Hold on a Payment](/how-to/place-a-hold-on-payment) guide for more information on this feature.
You will need to manually release the hold on the user's card at a later date to complete the payment.
Please note that Stripe only supports placing a hold on one-time payments, not recurring payments.
The method for automatically setting default payment methods depends on your checkout mode:
* **Payment mode**: Simply set "Setup Future Usage" to "Off Session" in the Stripe component options.
* **Setup mode**: Does not apply - payment methods are automatically set as default in this mode.
* **Subscription mode**: Set up a webhook from Stripe to Embeddables to automatically set the first payment method as default, [using this step-by-step guide](/how-to/assign-default-payment-methods).
When using **Setup** or **Payment** checkout modes, you can control whether a customer is created in Stripe.
Use the **Create a Customer in Stripe?** option in the Stripe component options, below the **Checkout Mode** setting.
This setting is not available for **Subscription** mode since customers are always created for recurring payments.
**Available options:**
* **If Required** (Default): A customer is only created if Stripe requires it for the specific payment method or transaction type.
* **Always**: A customer is always created in Stripe, regardless of whether it's required for the transaction.
If you choose to create customers, you can collect the Customer ID using the [Collect Stripe IDs](#collect-stripe-ids-to-send-to-your-backend) feature.
You can customise both the label on the Pay button and the message shown to users after a successful payment.
* **Pay button text** – Sets the label on the payment submit button (e.g. "Pay now", "Subscribe", "Complete purchase"). Supports templating, e.g. `{{cta_label}}`.
* **Success message** – Sets the confirmation message shown to the user after payment is completed. If the payment fails (e.g. card declined), the error message from Stripe is shown instead. Supports templating, e.g. `{{success_message}}`.
Both fields support **translations** — switch the content language in the Builder top bar to enter translated values for each language you have configured.
If the payment fails, for example if the credit card is declined, the error message returned from Stripe will be displayed to the user.
When **Disable button until page is valid** is enabled, the Stripe checkout button stays disabled until every required field on the page passes validation. As soon as all fields are valid the button becomes clickable.
This gives users a clear visual signal that they still have required fields to fill in before they can proceed to payment.
To enable this:
1. In the Builder, select the Stripe Checkout component.
2. In the right sidebar under **Options**, toggle **Disable button until page is valid** on.
You can style the button's disabled appearance independently in the Designer — select the Stripe checkout button element and switch to the **disabled** state to customise its look when locked.
This lets you choose a layout for the Stripe component, which affects how different payment method options are displayed to the user.
The following options are available:
* **Tabs** (default): This displays different payment methods in separate tabs, in a horizontal row across the top of the component.
* **Accordion**: This displays different payment methods in an accordion of expanded and collapsed sections, with one payment method option open at a time.
Apple Pay and Google Pay can be enabled as payment methods in your Stripe checkout. Here's how to set them up:
### Google Pay
* Enable Google Pay in your [Stripe Dashboard](https://dashboard.stripe.com/settings/payment_methods) under Payment Methods
* Once enabled, Google Pay will automatically appear as a payment option for users who:
* Are using Chrome browser
* Are logged into a Google account
* Have Google Pay set up on their account
* No additional configuration is required in Embeddables
### Apple Pay
* Enable Apple Pay in your [Stripe Dashboard](https://dashboard.stripe.com/settings/payment_methods) under Payment Methods
* You must verify your domain with Apple through the Stripe Dashboard:
1. Go to the Apple Pay Settings in your Stripe Dashboard
2. Add and verify your domain(s) where you'll be accepting Apple Pay
3. Follow Stripe's verification process to complete domain verification
* Once enabled and verified, Apple Pay will automatically appear as a payment option for users who:
* Are using Safari browser
* Are logged into an Apple account
* Have Apple Pay set up on their device
* No additional configuration is required in Embeddables
Both Apple Pay and Google Pay will only appear as payment options when the user's browser and account settings support them. If a user doesn't meet the requirements, they won't see these payment options.
Stripe Link is a fast-checkout payment method that lets users save and reuse their payment info across Stripe merchants.
1. **Enable Stripe Link in your [Stripe Dashboard](https://dashboard.stripe.com/settings/payment_methods)** under Payment Methods.
2. **Enable Stripe Link in Embeddables:**
In the Stripe component Options sidebar, select "Link" under the list of available Payment method types.
3. Once enabled in both places, Stripe Link will automatically appear as a payment option for users who:
* Have a Link account (or choose to create one at checkout)
* Are using a supported browser and device
The logic for which payment methods appear to users in your Stripe component (e.g. in the tabs at the top of the component) is controlled by two different systems:
1. **Embeddables Builder:** the settings your choose in the Stripe component Options sidebar.
2. **Stripe Dashboard Settings:** the settings you choose when logged into your Stripe Dashboard.
If you're seeing payment methods that you didn't expect, check both your Embeddables builder settings and your Stripe Dashboard configuration to identify where the setting is controlled.
The payment methods currently supported in Embeddables are:
* Credit/debit cards
* Apple Pay
* Google Pay
* Bank Account
* Link
* Afterpay/Clearpay
* Klarna
* PayPal (please note PayPal is NOT supported by Stripe in the US - for US PayPal payments, please use our dedicated PayPal component)
In general, a payment method will appear in the Stripe component if it is enabled in both the Embeddables builder and the Stripe Dashboard.
However, there are various exceptions to this rule, including:
**Bank Account**
* When Stripe Link is enabled in your Stripe Dashboard, the Bank Account payment method will automatically appear.
* This happens even if you haven't enabled bank transfers in Stripe's payment methods settings.
* To completely remove the Bank Account tab, you must disable Stripe Link entirely in your Stripe Dashboard.
Disabling Stripe Link will remove all Link-related payment options, not just bank transfers.
You can trigger [Actions](/features/actions) on the following Stripe Checkout events:
| Event | Triggered when | Checkout type |
| ---------------------- | ------------------------------------------------------------------ | ------------- |
| **Payment attempted** | The user clicks the Pay button (regardless of success or failure) | All |
| **Payment successful** | The payment is completed | All |
| **Payment failed** | The payment is declined | All |
| **Mounted** | The Stripe Checkout component is mounted (loaded onto the page) | All |
| **Unmounted** | The Stripe Checkout component is unmounted (removed from the page) | All |
To do this:
1. Create a new Action and type the JavaScript code you want to run.
2. Add a Trigger to the Action that fires on one of the above events.
The **Mounted** and **Unmounted** lifecycle triggers are useful for running setup or cleanup logic — for example, initialising analytics when the checkout appears, or tearing it down when the user navigates away.
This setting only appears and applies when the Stripe component is configured as **Express Checkout**. It has no effect on the standard Payment checkout type.
When **Prevent default click action** is enabled, the Express Checkout buttons (e.g. Apple Pay or Google Pay) become purely visual — they display the correct button(s) for the user's device but do **not** trigger any payment functionality when clicked. The payment flow is completely disabled on this component.
This turns the Express Checkout into a UI element you can use to capture the user's click intent without starting a transaction. The [**Payment button click**](#trigger-actions-on-express-checkout-button-click) trigger fires instead, allowing you to run custom logic in response to the click.
A typical workflow is to use the intercepted click to trigger a page change or popup that contains a **separate** Stripe Checkout component (one that does **not** have **Prevent default click action** enabled). This second component handles the actual payment. Without it, the user will not be able to complete a purchase.
To enable this:
1. In the Stripe component settings, locate the **Prevent default click action** toggle.
2. Enable it to prevent the default click behavior on Express Checkout buttons.
This component will not process payments on its own. You must provide another Stripe Checkout component (without this setting enabled) for the user to complete the payment.
This trigger only applies when the Stripe component is configured as **Express Checkout** and **Prevent default click action** is enabled. It does **not** fire for the standard Payment checkout type.
The **Payment button click** trigger fires when a user clicks an Express Checkout button (e.g. Apple Pay, Google Pay) whose default click behavior has been disabled via the [**Prevent default click action**](#prevent-default-click-action-on-express-checkout-buttons) setting. Since the button itself does not initiate any payment, this trigger is your entry point for deciding what happens next.
A common pattern is to use this trigger to navigate the user to a different page or open a popup that contains a **separate** Stripe Checkout component — one that is fully functional and can process the payment.
To use this trigger:
1. Enable **Prevent default click action** in the Stripe component settings.
2. Create a new Action with the logic you want to run when the Express Checkout button is clicked (e.g. navigate to a checkout page or open a popup).
3. Add a Trigger to the Action that fires on **Payment button click**.
If **Prevent default click action** is not enabled, this trigger will not fire, and Express Checkout buttons will behave as usual — clicking them will start the payment flow directly.
You can collect the following IDs that Stripe provides when a payment is completed:
| Stripe ID | Provided for |
| --------------------- | -------------------------------------------------------------------------------------------- |
| **Customer ID** | All payment types (for Payment and Setup modes, `Customer Creation` must be set up `Always`) |
| **Invoice ID** | All payments except on-hold payments and collecting card details |
| **Payment Intent ID** | One-time payments only |
Stripe used to provide a Subscription ID for recurring payments, but in their newer API version this is no longer the case. You can access this separately via the Stripe API.
#### To collect these IDs:
1. Specify a User Data key to store the ID in, in the relevant field in the Stripe component options.
2. Add that key to the Registered Keys in the Embeddable-wide settings.
#### To send them to your backend:
1. Set up an Action that's triggered when the payment is completed, as specified above in [Trigger actions on payment and lifecycle events](#trigger-actions-on-payment-and-lifecycle-events).
2. Use the relevant keys in `userData`, provided in the Action function's first argument.
**Example Action code:**
```javascript theme={null}
// All Actions must contain a function called output()
// Trigger this Action when the payment is completed
function output(userData) {
// Extract the relevant IDs from the userData object
const { customer_id, invoice_id, subscription_id } = userData;
console.log(customer_id, invoice_id, subscription_id);
// Send these IDs to your backend
fetch('https://your-backend-url.com/', {
method: 'POST',
body: JSON.stringify({ customer_id, invoice_id, subscription_id }),
});
}
```
Storing the plan or product that the user selected, and the status of the payment, can be useful when looking at your users' data later, or sending that data to your own backend or CRM.
The good news is that this information is almost certainly already being stored!
### Storing the plan or product
If you're offering multiple plans or products to the user, then that probably means you're either:
1. Using an Option Selector component to let the user select the plan or product they want to purchase, or
2. Using a Computed Field to calculate the appropriate plan or product based on the user's answers.
In both cases, just make sure that the key you're using to store the plan or product is set to be
[stored in the 'Embeddables Cloud Context'](https://docs.embeddables.com/features/user-data#where-is-user-data-stored%3F) - i.e. stored in Embeddables' database.
If you're offering multiple plans or products, you're also probably using a Computed Field to generate the **line items** for the Stripe component, including the price\_id(s).
You can then opt to store this in the 'Embeddables Cloud Context' as well.
Alternatively, you can store a simplified version with just the price\_id(s), by computing with with another Computed Field.
### Storing the payment status
The payment status is automatically stored in User Data, using the key of the Stripe component.
For this reason, we recommend choosing a straightforward key name for the Stripe component, e.g. `stripe_payment`.
The status will then appear in the User Data as one of the following:
* `stripe_payment: 'fresh'` - The Stripe checkout has been reset and is ready for another attempt
* `stripe_payment: 'pending'` - The payment has just been attempted, and is awaiting a success or failure response from Stripe
* `stripe_payment: 'error'` - The payment failed
* `stripe_payment: 'completed'` - The payment was successful
Just make sure that the key of the Stripe component is set to be
[stored in the 'Embeddables Cloud Context'](https://docs.embeddables.com/features/user-data#where-is-user-data-stored%3F) - i.e. stored in Embeddables' database.
You can specify a **Return url** in the Stripe component's Checkout Session configuration. This URL is passed to Stripe when creating the Checkout Session and determines where the customer is redirected after completing an external payment flow (e.g. a bank redirect or 3D Secure authentication).
**Return url** is used by Stripe for payment methods that redirect the customer away from your page during the checkout process. If you are only accepting credit card payments without redirects, this field is optional.
To configure a return URL:
1. In the Stripe component settings, locate the **Checkout Session** configuration section.
2. Enter the desired URL in the **Return url** field.
You can use templating in the **Return url** field to include dynamic values, e.g. `https://example.com/confirmation?email={{email}}`.
You can send custom metadata to Stripe with each payment, which is useful for tracking additional information about the customer or transaction.
In the Stripe component settings, look for the Metadata section. Here, you can add key-value pairs that will be sent to Stripe as metadata on the Checkout Session or Payment Intent.
* Enter a key (e.g., `user_id`, `order_source`, etc.) and a value.
* You can use templating in the value field, such as `{{user_id}}` or `{{email}}`, to dynamically insert user data. You can even compute a new value in a Computed Field and use that in the metadata.
* Click the `+` button to add more metadata fields.
Metadata is visible in the Stripe Dashboard and can be used for reporting, searching, or integrating with your backend.
## Troubleshooting
This likely means that you need to add your Stripe Publishable Key to your Embeddables project, for the appropriate environment.
**How to fix:**
* Go to **Settings** → **Credentials & Endpoints** in your Embeddables dashboard.
* In the **Stripe Credentials** section, click **+ New Stripe Credential**.
* Choose **Publishable Key** as the Key Type.
* Select the appropriate **Environment** (Test or Live).
* Add a descriptive **Label** and enter your Stripe publishable key.
* Click **Create** to save the credential.
If you are testing, ensure you are using the correct environment (test or live) and that the corresponding key is set up. See: [I'm seeing test mode errors on a live link](#im-seeing-test-mode-errors-on-a-live-link).
To use test keys, add
2. **Custom line item**: This lets you manually enter an amount, currency and name for the line item in Embeddables.
* Both types of line item require you to enter a quantity.
If you need your line items to be dynamic (i.e. change based on the user's answers, like what plan they select), see the [Add dynamic line items](#add-dynamic-line-items) section below.
* To insert the user's given email address into the Stripe checkout, add the key name of the component you use to collect the user's email, using **Templating** (e.g. `{{email}}`).
* You can optionally collect a user's phone number, using the same method.
By default, Stripe's credit card fields will also include Country and Zipcode / Postal Code fields.
These are all Stripe needs for a customer billing address, so you don't need to provide any billing address fields.
* Most brands want to [make sure a Customer is created in Stripe](#make-sure-a-customer-is-created-in-stripe) for new purchases, and [automatically set default payment methods in Stripe](#automatically-set-default-payment-methods-in-stripe) for those customers.
* It's worth deciding on [which payment method tabs](#control-which-payment-method-tabs-are-shown) you want to show to customers, including setting up [Apple Pay and Google Pay](#set-up-apple-pay-and-google-pay) if desired, and deciding whether to enable [Stripe Link](#set-up-stripe-link).
* You may want to [collect shipping information](#collect-shipping-information) if you're sending a physical product (billing information is usually collected automatically by Stripe using the zipcode/postal code field).
* See below for a full list of optional settings you might want to configure.
## Optional: Additional Stripe configurations
These features are not required in order to successfully accept payments, but they can be useful in different scenarios.
To collect shipping information from the user, you need to make sure you have the relevant input components in your Embeddable:
* Address Line 1
* Address Line 2
* City
* State
* Zipcode / Postal Code
* Country
Then, enter the keys of these components in the Shipping Address fields in the Stripe component using Templating, e.g. `{{address_line_1}}`.
Shipping information is optional, depending on whether you're sending the customer a physical product.
Billing information is required, but only country and postal code. This is handled automatically by the Stripe component, as described above, so you don't need to add your own billing address fields.
Sometimes you need your line items to be dynamic - i.e. change based on the user's answers, such as the plan that they select.
To do this:
1. Use a [Computed Field](/features/computed-fields)\` to generate the JSON for the line items.
2. Refernce the key of that Computed Field in the Line Items section of the Stripe component.
In order for the Stripe component to still work when the Embeddable is in test mode, you need to ensure that the Computed Field handles test mode correctly by returning a test price\_id.
**Example Computed Field code:**
```javascript theme={null}
// @TODO: Delete one of these based on whether you're charging a recurring or one-time payment
const TEST_PRICE_ID = 'price_1JMwNRIQ3JVMlttKsvCn3lK3' // This is a recurring Embeddables-provided test price ID
const TEST_PRICE_ID = 'price_1KGqjRIQ3JVMlttKzJ059opF' // This is a one-time Embeddables-provided test price ID
// @TODO: Replace these constants
const PRICE_ID_PLAN_1 = 'price_aaaaaaaaaaaaaaaaaaaaaaaa'
const PRICE_ID_PLAN_2 = 'price_bbbbbbbbbbbbbbbbbbbbbbbb'
// All Computed Fields must contain a function called result()
function result(userData) {
// Determine whether we're in test mode
const url = new URL(window.location)
const isTestMode = url.searchParams.get('savvy_test') === 'true'
|| (!url.searchParams.get('savvy_test') && url.searchParams.get('savvy_env'))
|| (!url.searchParams.get('savvy_test') && url.host.endsWith('embeddables.com'))
const testPriceId = TEST_PRICE_ID
// Determine which price_id the user has selected
const selectedPriceId = userData.selected_plan === 'advanced' ? PRICE_ID_PLAN_2 : PRICE_ID_PLAN_1
// If we're in test mode, use the test price_id, otherwise use the selected product's price_id
const priceId = isTestMode ? testPriceId : selectedPriceId
// Return the line items
return [
{
price: priceId,
quantity: 1,
},
];
}
```
You can set pretty much any value in the Stripe component based on dynamic data, such as the user's answers to a question (e.g. their email address), or a value that's computed from an answer (e.g. the post-purchase success message).
For values that come directly from user answers (like email, phone number, or shipping address):
1. Add an input component (like Email Input, Phone Input, etc.) to your Embeddable where you want to collect the user's information.
2. In the Stripe component settings, locate the field you want to set dynamically.
3. Use templating syntax to reference the input component's key, e.g. `{{email}}` or `{{phone}}`.
This works for any field in the Stripe component that accepts templating, including:
* Customer email
* Customer phone
* Shipping address fields
* Pay button text
* Success message
For values that need to be calculated or transformed (like a dynamic success message):
Create a [Computed Field](/features/computed-fields) that will generate the value you want.
In the Computed Field, write code that returns the final value. For example:
```javascript theme={null}
function result(userData) {
const name = userData.first_name || 'there';
return `Thanks ${name}! Your payment has been processed successfully.`;
}
```
In the Stripe component settings, use templating to reference the Computed Field's key, e.g. `{{success_message}}`.
You can mix and match both approaches - some fields might use simple templating while others use computed fields, depending on your needs.
If you handle multiple Stripe products or prices in your Embeddable, we recommend adding them to a table in the [Embeddables CMS](/features/cms), and pulling those records into your Embeddable to use in your Stripe component.
See the [Control Stripe Prices from the Embeddables CMS](/how-to/control-stripe-prices-from-cms) guide for more information.
You can offer discounts to your customers using Stripe's coupon and promo code system. This lets you create both customer-facing promo codes (like "BLACKFRIDAY50") and automatic discounts.
See the [Use Stripe Coupons and Promo Codes](/how-to/use-stripe-coupons-and-promo-codes) guide for more information.
If you have more than one Stripe Checkout component on the same page (for example, a Payment element and an Express Checkout element side-by-side), you can make them share a single underlying Stripe Checkout session by setting `use_shared_stripe_session: true` on each component.
**Why use this?**
* Ensures coupons and promo codes applied to the session are immediately reflected on every component's "Pay" button.
* Avoids creating multiple independent checkout sessions for the same purchase, which could lead to duplicate charges.
**How to enable it:**
1. In the Builder, select each Stripe Checkout component that should share the session.
2. Open the component's JSON editor and add `"use_shared_stripe_session": true` to the component's options.
3. Repeat for every Stripe Checkout component on that page that should participate.
All components in the shared session must use the same **Checkout mode** (e.g. all Payment, or all Subscription) and the same **currency**. Mismatched values will produce an error.
Shared sessions are scoped to a single page. Components on different pages each create their own independent session.
When `disable_button_until_page_valid` is set to `true` on a Stripe Checkout 2 component, the Pay button is disabled reactively whenever any required field on the current page is incomplete or invalid. The button re-enables as soon as all required fields are satisfied.
This is different from `enforce_validation`, which only blocks the payment attempt at the moment the user clicks Pay. With `disable_button_until_page_valid` the button itself is visually disabled throughout, giving users an immediate cue that they still need to fill something in.
**How to enable it:**
1. In the Builder, select the Stripe Checkout 2 component.
2. Open the component's JSON editor and add `"disable_button_until_page_valid": true`.
You can style the disabled state however you like using CSS targeting `[disabled]` on the Pay button element. No default disabled style is applied — full control is yours.
This setting works in conjunction with the existing `enforce_validation` option. If you only want to block the payment attempt (without visually disabling the button beforehand), use `enforce_validation: true` without setting `disable_button_until_page_valid`.
See the [Place a Hold on a Payment](/how-to/place-a-hold-on-payment) guide for more information on this feature.
You will need to manually release the hold on the user's card at a later date to complete the payment.
Please note that Stripe only supports placing a hold on one-time payments, not recurring payments.
The method for automatically setting default payment methods depends on your checkout mode:
* **Payment mode**: Simply set "Setup Future Usage" to "Off Session" in the Stripe component options.
* **Setup mode**: Does not apply - payment methods are automatically set as default in this mode.
* **Subscription mode**: Set up a webhook from Stripe to Embeddables to automatically set the first payment method as default, [using this step-by-step guide](/how-to/assign-default-payment-methods).
When using **Setup** or **Payment** checkout modes, you can control whether a customer is created in Stripe.
Use the **Create a Customer in Stripe?** option in the Stripe component options, below the **Checkout Mode** setting.
This setting is not available for **Subscription** mode since customers are always created for recurring payments.
**Available options:**
* **If Required** (Default): A customer is only created if Stripe requires it for the specific payment method or transaction type.
* **Always**: A customer is always created in Stripe, regardless of whether it's required for the transaction.
If you choose to create customers, you can collect the Customer ID using the [Collect Stripe IDs](#collect-stripe-ids-to-send-to-your-backend) feature.
You can customise both the label on the Pay button and the message shown to users after a successful payment.
* **Pay button text** – Sets the label on the payment submit button (e.g. "Pay now", "Subscribe", "Complete purchase"). Supports templating, e.g. `{{cta_label}}`.
* **Success message** – Sets the confirmation message shown to the user after payment is completed. If the payment fails (e.g. card declined), the error message from Stripe is shown instead. Supports templating, e.g. `{{success_message}}`.
Both fields support **translations** — switch the content language in the Builder top bar to enter translated values for each language you have configured.
If the payment fails, for example if the credit card is declined, the error message returned from Stripe will be displayed to the user.
When **Disable button until page is valid** is enabled, the Stripe checkout button stays disabled until every required field on the page passes validation. As soon as all fields are valid the button becomes clickable.
This gives users a clear visual signal that they still have required fields to fill in before they can proceed to payment.
To enable this:
1. In the Builder, select the Stripe Checkout component.
2. In the right sidebar under **Options**, toggle **Disable button until page is valid** on.
You can style the button's disabled appearance independently in the Designer — select the Stripe checkout button element and switch to the **disabled** state to customise its look when locked.
This lets you choose a layout for the Stripe component, which affects how different payment method options are displayed to the user.
The following options are available:
* **Tabs** (default): This displays different payment methods in separate tabs, in a horizontal row across the top of the component.
* **Accordion**: This displays different payment methods in an accordion of expanded and collapsed sections, with one payment method option open at a time.
Apple Pay and Google Pay can be enabled as payment methods in your Stripe checkout. Here's how to set them up:
### Google Pay
* Enable Google Pay in your [Stripe Dashboard](https://dashboard.stripe.com/settings/payment_methods) under Payment Methods
* Once enabled, Google Pay will automatically appear as a payment option for users who:
* Are using Chrome browser
* Are logged into a Google account
* Have Google Pay set up on their account
* No additional configuration is required in Embeddables
### Apple Pay
* Enable Apple Pay in your [Stripe Dashboard](https://dashboard.stripe.com/settings/payment_methods) under Payment Methods
* You must verify your domain with Apple through the Stripe Dashboard:
1. Go to the Apple Pay Settings in your Stripe Dashboard
2. Add and verify your domain(s) where you'll be accepting Apple Pay
3. Follow Stripe's verification process to complete domain verification
* Once enabled and verified, Apple Pay will automatically appear as a payment option for users who:
* Are using Safari browser
* Are logged into an Apple account
* Have Apple Pay set up on their device
* No additional configuration is required in Embeddables
Both Apple Pay and Google Pay will only appear as payment options when the user's browser and account settings support them. If a user doesn't meet the requirements, they won't see these payment options.
Stripe Link is a fast-checkout payment method that lets users save and reuse their payment info across Stripe merchants.
1. **Enable Stripe Link in your [Stripe Dashboard](https://dashboard.stripe.com/settings/payment_methods)** under Payment Methods.
2. **Enable Stripe Link in Embeddables:**
In the Stripe component Options sidebar, select "Link" under the list of available Payment method types.
3. Once enabled in both places, Stripe Link will automatically appear as a payment option for users who:
* Have a Link account (or choose to create one at checkout)
* Are using a supported browser and device
The logic for which payment methods appear to users in your Stripe component (e.g. in the tabs at the top of the component) is controlled by two different systems:
1. **Embeddables Builder:** the settings your choose in the Stripe component Options sidebar.
2. **Stripe Dashboard Settings:** the settings you choose when logged into your Stripe Dashboard.
If you're seeing payment methods that you didn't expect, check both your Embeddables builder settings and your Stripe Dashboard configuration to identify where the setting is controlled.
The payment methods currently supported in Embeddables are:
* Credit/debit cards
* Apple Pay
* Google Pay
* Bank Account
* Link
* Afterpay/Clearpay
* Klarna
* PayPal (please note PayPal is NOT supported by Stripe in the US - for US PayPal payments, please use our dedicated PayPal component)
In general, a payment method will appear in the Stripe component if it is enabled in both the Embeddables builder and the Stripe Dashboard.
However, there are various exceptions to this rule, including:
**Bank Account**
* When Stripe Link is enabled in your Stripe Dashboard, the Bank Account payment method will automatically appear.
* This happens even if you haven't enabled bank transfers in Stripe's payment methods settings.
* To completely remove the Bank Account tab, you must disable Stripe Link entirely in your Stripe Dashboard.
Disabling Stripe Link will remove all Link-related payment options, not just bank transfers.
You can trigger [Actions](/features/actions) on the following Stripe Checkout events:
| Event | Triggered when | Checkout type |
| ---------------------- | ------------------------------------------------------------------ | ------------- |
| **Payment attempted** | The user clicks the Pay button (regardless of success or failure) | All |
| **Payment successful** | The payment is completed | All |
| **Payment failed** | The payment is declined | All |
| **Mounted** | The Stripe Checkout component is mounted (loaded onto the page) | All |
| **Unmounted** | The Stripe Checkout component is unmounted (removed from the page) | All |
To do this:
1. Create a new Action and type the JavaScript code you want to run.
2. Add a Trigger to the Action that fires on one of the above events.
The **Mounted** and **Unmounted** lifecycle triggers are useful for running setup or cleanup logic — for example, initialising analytics when the checkout appears, or tearing it down when the user navigates away.
This setting only appears and applies when the Stripe component is configured as **Express Checkout**. It has no effect on the standard Payment checkout type.
When **Prevent default click action** is enabled, the Express Checkout buttons (e.g. Apple Pay or Google Pay) become purely visual — they display the correct button(s) for the user's device but do **not** trigger any payment functionality when clicked. The payment flow is completely disabled on this component.
This turns the Express Checkout into a UI element you can use to capture the user's click intent without starting a transaction. The [**Payment button click**](#trigger-actions-on-express-checkout-button-click) trigger fires instead, allowing you to run custom logic in response to the click.
A typical workflow is to use the intercepted click to trigger a page change or popup that contains a **separate** Stripe Checkout component (one that does **not** have **Prevent default click action** enabled). This second component handles the actual payment. Without it, the user will not be able to complete a purchase.
To enable this:
1. In the Stripe component settings, locate the **Prevent default click action** toggle.
2. Enable it to prevent the default click behavior on Express Checkout buttons.
This component will not process payments on its own. You must provide another Stripe Checkout component (without this setting enabled) for the user to complete the payment.
This trigger only applies when the Stripe component is configured as **Express Checkout** and **Prevent default click action** is enabled. It does **not** fire for the standard Payment checkout type.
The **Payment button click** trigger fires when a user clicks an Express Checkout button (e.g. Apple Pay, Google Pay) whose default click behavior has been disabled via the [**Prevent default click action**](#prevent-default-click-action-on-express-checkout-buttons) setting. Since the button itself does not initiate any payment, this trigger is your entry point for deciding what happens next.
A common pattern is to use this trigger to navigate the user to a different page or open a popup that contains a **separate** Stripe Checkout component — one that is fully functional and can process the payment.
To use this trigger:
1. Enable **Prevent default click action** in the Stripe component settings.
2. Create a new Action with the logic you want to run when the Express Checkout button is clicked (e.g. navigate to a checkout page or open a popup).
3. Add a Trigger to the Action that fires on **Payment button click**.
If **Prevent default click action** is not enabled, this trigger will not fire, and Express Checkout buttons will behave as usual — clicking them will start the payment flow directly.
You can collect the following IDs that Stripe provides when a payment is completed:
| Stripe ID | Provided for |
| --------------------- | -------------------------------------------------------------------------------------------- |
| **Customer ID** | All payment types (for Payment and Setup modes, `Customer Creation` must be set up `Always`) |
| **Invoice ID** | All payments except on-hold payments and collecting card details |
| **Payment Intent ID** | One-time payments only |
Stripe used to provide a Subscription ID for recurring payments, but in their newer API version this is no longer the case. You can access this separately via the Stripe API.
#### To collect these IDs:
1. Specify a User Data key to store the ID in, in the relevant field in the Stripe component options.
2. Add that key to the Registered Keys in the Embeddable-wide settings.
#### To send them to your backend:
1. Set up an Action that's triggered when the payment is completed, as specified above in [Trigger actions on payment and lifecycle events](#trigger-actions-on-payment-and-lifecycle-events).
2. Use the relevant keys in `userData`, provided in the Action function's first argument.
**Example Action code:**
```javascript theme={null}
// All Actions must contain a function called output()
// Trigger this Action when the payment is completed
function output(userData) {
// Extract the relevant IDs from the userData object
const { customer_id, invoice_id, subscription_id } = userData;
console.log(customer_id, invoice_id, subscription_id);
// Send these IDs to your backend
fetch('https://your-backend-url.com/', {
method: 'POST',
body: JSON.stringify({ customer_id, invoice_id, subscription_id }),
});
}
```
Storing the plan or product that the user selected, and the status of the payment, can be useful when looking at your users' data later, or sending that data to your own backend or CRM.
The good news is that this information is almost certainly already being stored!
### Storing the plan or product
If you're offering multiple plans or products to the user, then that probably means you're either:
1. Using an Option Selector component to let the user select the plan or product they want to purchase, or
2. Using a Computed Field to calculate the appropriate plan or product based on the user's answers.
In both cases, just make sure that the key you're using to store the plan or product is set to be
[stored in the 'Embeddables Cloud Context'](https://docs.embeddables.com/features/user-data#where-is-user-data-stored%3F) - i.e. stored in Embeddables' database.
If you're offering multiple plans or products, you're also probably using a Computed Field to generate the **line items** for the Stripe component, including the price\_id(s).
You can then opt to store this in the 'Embeddables Cloud Context' as well.
Alternatively, you can store a simplified version with just the price\_id(s), by computing with with another Computed Field.
### Storing the payment status
The payment status is automatically stored in User Data, using the key of the Stripe component.
For this reason, we recommend choosing a straightforward key name for the Stripe component, e.g. `stripe_payment`.
The status will then appear in the User Data as one of the following:
* `stripe_payment: 'fresh'` - The Stripe checkout has been reset and is ready for another attempt
* `stripe_payment: 'pending'` - The payment has just been attempted, and is awaiting a success or failure response from Stripe
* `stripe_payment: 'error'` - The payment failed
* `stripe_payment: 'completed'` - The payment was successful
Just make sure that the key of the Stripe component is set to be
[stored in the 'Embeddables Cloud Context'](https://docs.embeddables.com/features/user-data#where-is-user-data-stored%3F) - i.e. stored in Embeddables' database.
You can specify a **Return url** in the Stripe component's Checkout Session configuration. This URL is passed to Stripe when creating the Checkout Session and determines where the customer is redirected after completing an external payment flow (e.g. a bank redirect or 3D Secure authentication).
**Return url** is used by Stripe for payment methods that redirect the customer away from your page during the checkout process. If you are only accepting credit card payments without redirects, this field is optional.
To configure a return URL:
1. In the Stripe component settings, locate the **Checkout Session** configuration section.
2. Enter the desired URL in the **Return url** field.
You can use templating in the **Return url** field to include dynamic values, e.g. `https://example.com/confirmation?email={{email}}`.
You can send custom metadata to Stripe with each payment, which is useful for tracking additional information about the customer or transaction.
In the Stripe component settings, look for the Metadata section. Here, you can add key-value pairs that will be sent to Stripe as metadata on the Checkout Session or Payment Intent.
* Enter a key (e.g., `user_id`, `order_source`, etc.) and a value.
* You can use templating in the value field, such as `{{user_id}}` or `{{email}}`, to dynamically insert user data. You can even compute a new value in a Computed Field and use that in the metadata.
* Click the `+` button to add more metadata fields.
Metadata is visible in the Stripe Dashboard and can be used for reporting, searching, or integrating with your backend.
## Troubleshooting
This likely means that you need to add your Stripe Publishable Key to your Embeddables project, for the appropriate environment.
**How to fix:**
* Go to **Settings** → **Credentials & Endpoints** in your Embeddables dashboard.
* In the **Stripe Credentials** section, click **+ New Stripe Credential**.
* Choose **Publishable Key** as the Key Type.
* Select the appropriate **Environment** (Test or Live).
* Add a descriptive **Label** and enter your Stripe publishable key.
* Click **Create** to save the credential.
If you are testing, ensure you are using the correct environment (test or live) and that the corresponding key is set up. See: [I'm seeing test mode errors on a live link](#im-seeing-test-mode-errors-on-a-live-link).
To use test keys, add ?savvy\_test=true to your URL.
This means that you need to add a Stripe Restricted Key with the [scopes/permissions listed above](#keys-and-ids-that-you'll-need) to your Embeddables project.
**How to fix:**
* Go to **Settings** → **Credentials & Endpoints** in your Embeddables dashboard.
* In the **Stripe Credentials** section, click **+ New Stripe Credential**.
* Choose **Restricted Key** as the Key Type.
* Select the appropriate **Environment** (Test or Live).
* Add a descriptive **Label** and enter your Stripe restricted key.
* Make sure the key has the correct permissions, listed [above](#keys-and-ids-that-you’ll-need).
* Click **Create** to save the credential.
This means that you have at least one line item that is not using a Price ID (a pre-created price in Stripe), nor is it using a Price Data object (a custom price created in the Embeddables Builder).
If you're using a Computed Field to generate the line items, check the value that it's returning, and make sure it's being passed into the Stripe component.
This means that you're using a **test mode** Price ID, but are testing Stripe in **live mode**.
There are two common causes of this:
1. You're using a test mode Price ID in your Computed Field, but have not set the Embeddable to test mode.
To make sure that you're in Test Mode, ensure that one of the following is true:
* You're testing on a link with `?savvy_test=true` in the URL, OR
* You're testing on a `engine.embeddables.com/preview` link
2. You've set the Embeddable to test mode, but the Public and Restricted keys that you gave to the Embeddables Team to use for Test Mode were actually live mode keys.
To check which Stripe keys are being used:
1. Open the Developer Tools in your browser and go to the Elements tab.
2. Use `Cmd+F` / `Ctrl+F` to search for `data-flow-stripe-publishable-key-value`.
3. Check whether the value starts with `pk_live_` or `pk_test_`.
See: [Adding dynamic line items](#add-dynamic-line-items) for more information on how to handle this.
This likely means that you're testing with a Price ID that comes from a different Stripe account from the one that you're using to accept payments.
For example, you might be using a live mode Price ID from your own Stripe account, but the Embeddable is currently in Test Mode and connected to the Embeddables-provided Stripe account.
See: [Adding dynamic line items](#add-dynamic-line-items) for more information on how to handle this.
If you see errors about test keys or test Price IDs while using a live link, it usually means that the keys you've added to your project are for test mode only.
**Fixes to try:**
* Check your project's Stripe credentials in **Settings** → **Credentials & Endpoints**.
* If you want to test in live mode, you must add **live mode** keys to your project.
* If both keys are test keys, you can only test in test mode (`?savvy_test=true`).
If you see errors about live keys or live Price IDs while using a test link (or with `?savvy_test=true`), it usually means that the keys you've added to your project are for live mode only.
**Fixes to try:**
* Check your project's Stripe credentials in **Settings** → **Credentials & Endpoints**.
* If you want to test in test mode, you must add **test mode** keys to your project.
* If both keys are live keys, you can only test in live mode (remove `?savvy_test=true` from the URL).